Dizneydaz
DIS Veteran
- Joined
- Jul 12, 2005
Hi. I resurrected this posting from another disboarders thread on which I had posted my t shirt instructions. Hope you find something you can use!
Instructions for Mickey shirts
Black and gray (spider web like)
I started with a basic 100% cotton black t-shirt (I got mine @ Micheals). Prewash and dry the shirt. About $2-2.50 on sale. My mom and I dont like the high neck of these shirts so I revised the neckline. I found the center of the front of the shirt and cut down a few inches from the collar (dont go too low). Then I just ironed them into a v-neck and used iron-on fusible webbing to secure the new neck. Ive washed them several times and the webbing has held. They can also be sewn in place.
This step is the same for either method, any color.
For the Mickey shape, either freehand it or (this is what I do) find 2 of the right proportion circle shapes. Ive used pan lids, glass, plastic bowls, etc. Center the largest circle and trace around (for dark shirts I use my DD chalk.) Light colors use light pencil. If youre worried about the pencil showing you can do it on the inside) Then do the same with the smaller circles for the ears.
The next step takes the most skill, and its not much! Its easier, especially on your first one, to only do the front layer. If you do both the front and back at once, it can get pretty bulky. Ive done it that way and it does create a less distinct Mickey on the back. You can also do the front and back separately.


Mickey stitched with floss on white shirt--------------------------------Stitched on black shirt
I use a large eyed needle and dental floss. Follow the outline of the Mickey using about ¼ stitches. I start at the top of his head. Leave enough floss at the end to pull on. After youve finished the outline, pull the floss bringing in the shape. Get it as tight as you can and then tie it off. Then wrap 1, or more, rubber bands around the tied area, the tighter, the better. This is the area thatll retain the original shirt color. Then continue rubber banding the rest off the shirt keeping in mind the color will stay original where its banded. After youre all banded it almost looks like a snake.


After banding, white shirt--------------After dye applied, on white shirt
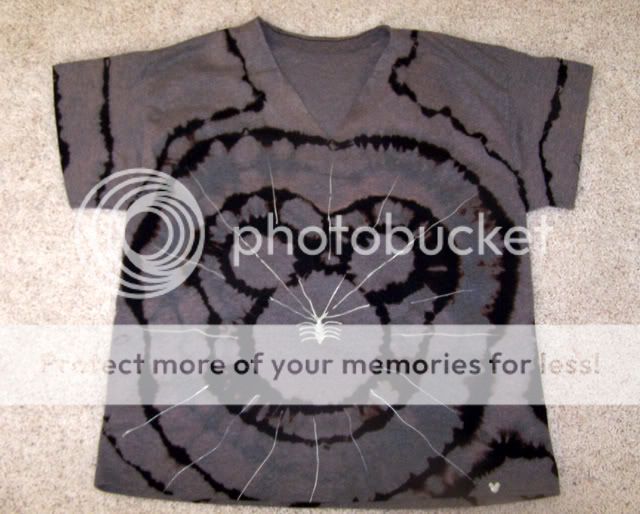
For the black shirts, I then used Rite Color Remover and followed the stove-top directions. I did 2 shirts at once using one packet. Open the windows because this stuff stinks! After about 30 min. take out and rinse per instructions. Leave the bands on. Then I put the shirt in a sink with warm water and some bleach. Sorry I didnt measure it, probably about ½ cup with enough water to cover the shirts. I let these soak overnight. In the morning they still looked about the same color as when I took them out of the Color Remover but then after I washed them (with the bands still on) they came out the gray color. Remove the bands, open up, and admire your work! They should be washed and dried again to remove all the chemicals. Then I added the spider webbing with Glow-in-the-Dark fabric paint. I used Scribbles, 3-D paint, glow-in-the-dark, Natural.


Tiger shirt banded---------------------------------------------------Tiger shirt on stove----=---------------2 tiger shirts banded-after color removed, in bleach
For the true tie-dyed shirts follow the instructions for the Mickey shape and the rubber banding, above. On these I did 5 color bands. I used the tie-dye kit from Walmart (they also sell it at Micheals, etc.) and followed the directions. The kit includes everything you need including the ash you need to soak the shirt in before applying the dye. Following the instructions, I applied the dye. I did Mickeys head yellow, the next band green, then blue, then purple, ending with pink. Leave on as per instructions. I wrapped mine in Saran Wrap to keep the colors from spreading . For my mom and my shirts I used White Stag brand from Walmart instead of the traditional T. We like the scoop neck better. Any 100% cotton shirt will work. I used Clorox bleach pen to clean up the Mickey face a little and then reapplied some dye. The shirts are alot lighter once they are washed.

With bleach on it, cleaning up some areas.
 -
-
 [/URL]
2005 The 3 of us in our tye-dyed shirts!------------------Our halloween shirts-2006. Customized necklines
On my DD shirt I used a Clorox bleach pen to write September 2005 across the bottom. It shows up faintly in the picture.

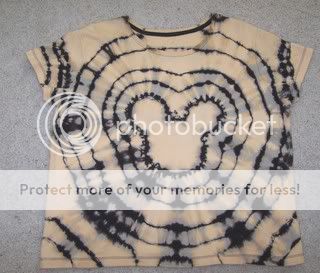
Ive included a few of the other colors Ive done so far. The one that looks like tiger colors started out as a black, womens White Stag shirt. I expected it to do the same as the other black T, but I got this lovely golden yellow instead of grey. I used the color remover and the bleach on this shirt. These shirts released the color quicker than the standard T. I only left it in the color remover for about 15 minutes and about 1-2 hours in the bleach


Tiger shirt-I got alot of comments on
this one, especially from AK CMs. ----------Final spider Mickey

-Rosey Mickey with glitter
The other shirt was a dark brown kids Faded Glory (Walmart) and I only used bleach on it. The brown turned into a nice rose pink color. You probably cant see it in the picture, but Ive sprayed fabric glitter (Michaels) on it to make it a little prettier for my DD. She enjoys wearing this one to school.

Dark purple shirt-done with bleach only.

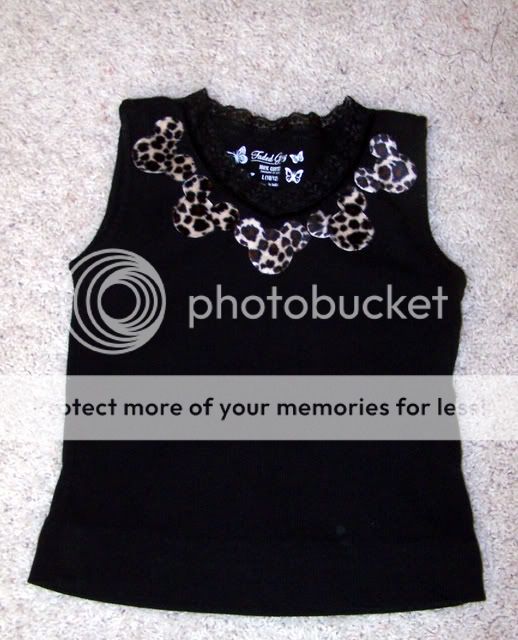
This was done with animal print fabric and iron on fusible webbing. I also did the same thing a some hats. Edge the fabric with dimensional paints (Tulip, etc.)

This particular shirt started life as a girl's shirt with lace trim. I tried to find a black tank for DD and couldn't. I modified it into a tank and added the fabric mickeys with fusible webbing.
Have fun and get creative! Making these can be addictive! See ya around the world!
PM me if you have any questions.
Instructions for Mickey shirts
Black and gray (spider web like)
I started with a basic 100% cotton black t-shirt (I got mine @ Micheals). Prewash and dry the shirt. About $2-2.50 on sale. My mom and I dont like the high neck of these shirts so I revised the neckline. I found the center of the front of the shirt and cut down a few inches from the collar (dont go too low). Then I just ironed them into a v-neck and used iron-on fusible webbing to secure the new neck. Ive washed them several times and the webbing has held. They can also be sewn in place.
This step is the same for either method, any color.
For the Mickey shape, either freehand it or (this is what I do) find 2 of the right proportion circle shapes. Ive used pan lids, glass, plastic bowls, etc. Center the largest circle and trace around (for dark shirts I use my DD chalk.) Light colors use light pencil. If youre worried about the pencil showing you can do it on the inside) Then do the same with the smaller circles for the ears.
The next step takes the most skill, and its not much! Its easier, especially on your first one, to only do the front layer. If you do both the front and back at once, it can get pretty bulky. Ive done it that way and it does create a less distinct Mickey on the back. You can also do the front and back separately.


Mickey stitched with floss on white shirt--------------------------------Stitched on black shirt
I use a large eyed needle and dental floss. Follow the outline of the Mickey using about ¼ stitches. I start at the top of his head. Leave enough floss at the end to pull on. After youve finished the outline, pull the floss bringing in the shape. Get it as tight as you can and then tie it off. Then wrap 1, or more, rubber bands around the tied area, the tighter, the better. This is the area thatll retain the original shirt color. Then continue rubber banding the rest off the shirt keeping in mind the color will stay original where its banded. After youre all banded it almost looks like a snake.


After banding, white shirt--------------After dye applied, on white shirt
For the black shirts, I then used Rite Color Remover and followed the stove-top directions. I did 2 shirts at once using one packet. Open the windows because this stuff stinks! After about 30 min. take out and rinse per instructions. Leave the bands on. Then I put the shirt in a sink with warm water and some bleach. Sorry I didnt measure it, probably about ½ cup with enough water to cover the shirts. I let these soak overnight. In the morning they still looked about the same color as when I took them out of the Color Remover but then after I washed them (with the bands still on) they came out the gray color. Remove the bands, open up, and admire your work! They should be washed and dried again to remove all the chemicals. Then I added the spider webbing with Glow-in-the-Dark fabric paint. I used Scribbles, 3-D paint, glow-in-the-dark, Natural.


Tiger shirt banded---------------------------------------------------Tiger shirt on stove----=---------------2 tiger shirts banded-after color removed, in bleach
For the true tie-dyed shirts follow the instructions for the Mickey shape and the rubber banding, above. On these I did 5 color bands. I used the tie-dye kit from Walmart (they also sell it at Micheals, etc.) and followed the directions. The kit includes everything you need including the ash you need to soak the shirt in before applying the dye. Following the instructions, I applied the dye. I did Mickeys head yellow, the next band green, then blue, then purple, ending with pink. Leave on as per instructions. I wrapped mine in Saran Wrap to keep the colors from spreading . For my mom and my shirts I used White Stag brand from Walmart instead of the traditional T. We like the scoop neck better. Any 100% cotton shirt will work. I used Clorox bleach pen to clean up the Mickey face a little and then reapplied some dye. The shirts are alot lighter once they are washed.

With bleach on it, cleaning up some areas.


2005 The 3 of us in our tye-dyed shirts!------------------Our halloween shirts-2006. Customized necklines
On my DD shirt I used a Clorox bleach pen to write September 2005 across the bottom. It shows up faintly in the picture.

Ive included a few of the other colors Ive done so far. The one that looks like tiger colors started out as a black, womens White Stag shirt. I expected it to do the same as the other black T, but I got this lovely golden yellow instead of grey. I used the color remover and the bleach on this shirt. These shirts released the color quicker than the standard T. I only left it in the color remover for about 15 minutes and about 1-2 hours in the bleach


Tiger shirt-I got alot of comments on
this one, especially from AK CMs. ----------Final spider Mickey

-Rosey Mickey with glitter
The other shirt was a dark brown kids Faded Glory (Walmart) and I only used bleach on it. The brown turned into a nice rose pink color. You probably cant see it in the picture, but Ive sprayed fabric glitter (Michaels) on it to make it a little prettier for my DD. She enjoys wearing this one to school.

Dark purple shirt-done with bleach only.

This was done with animal print fabric and iron on fusible webbing. I also did the same thing a some hats. Edge the fabric with dimensional paints (Tulip, etc.)

This particular shirt started life as a girl's shirt with lace trim. I tried to find a black tank for DD and couldn't. I modified it into a tank and added the fabric mickeys with fusible webbing.
Have fun and get creative! Making these can be addictive! See ya around the world!
PM me if you have any questions.


